
This is another write-up from back when I was making various modifications to my ’99 Miata. For this project I modified an installation of a Duetto Motors keyless entry unit, which I added because they didn’t come with the car back then. Here’s the article as written:
For those of you who are contemplating or have already installed the keyless entry unit from Duetto Motors in your ’99, here are a few tips to go with the excellent write-up in the Garage section.
I accepted the challenge presented in the write-up and discovered a way to use the existing connector between the door and body to run the two new wires. Many of you may decide that this procedure is too much trouble, but for those of you who do not want extra wires running between the door and would still like be able to detach the wiring connector, read on.
First disconnect the existing connector. Above where the accordion tube enters the shell is a small raised circular area. Inside of this is a small green plunger. Using a small flat bladed screwdriver, pull this plunger out as far as it will go (about 1/4″). This should allow the connector to disconnect.
Peel the rubber dust boot back from the white plastic connector.
Now, let’s remove the connector from the body. Take 8 years of yoga lessons to enable you to look up under the dash at the inside of the connector. Grab the wire bundle coming from the connector and push slightly. While still pushing from the inside, use a small screwdriver on the outside and press down on the release in the middle top of the connector. There is also a release in the middle bottom, use this to free the bottom of the connector in the same manner. Push the connector out towards the door using the wires until the top of the connector is out. Tilt the bottom of the connector towards the body and push it inside. You need to tilt the connector enough to let the lip on the bottom of the connector clear the opening. Now with the connector still tilted, push it the rest of the way inside making sure the lip at the top clears the opening. Once the connector slips inside, pull it down below the dash.
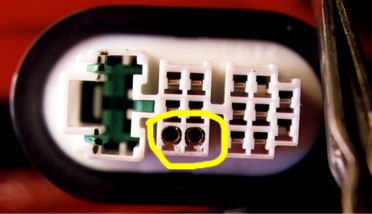
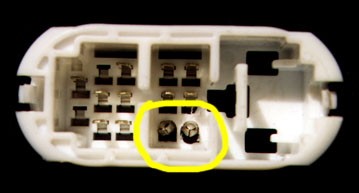
Looking closely at both halves of the connector, you will see two unused spaces.
This is where we will be installing the contacts for our wires. Since it is impossible to find the OEM contacts, we will use Molex contacts available at Radio Shack. You can’t buy the contacts separately, but you can get all you need with the 2 position Molex connector for $0.99. The Radio Shack PN is 274-222. Here is how both halves of the connector look with the new contacts installed.
To fit the contacts into the connector use a 0.125″ (1/8″) drill bit to drill out each of the four contact locations, two in each half of the connector. Drill all of the way through being careful of the existing wires when you break through. Let the bit seek out its own position when going through the plastic.
On the door half of the connector only, we need to counterbore the two holes 3/8″ deep using a 0.156″ (5/32″) diameter drill bit. Measure 3/8″ back from the tip of the bit and wrap a piece of tape around the bit at this point. Now re-drill each hole slowly, going only as deep as the tape. This counterbore allows the female contact to expand when the male contact is inserted.
Run your wires from the actuator through the accordion hose but not through the connector yet. Attach a female Molex contact to each wire.
Now using a small screwdriver or other suitable object, press each contact, starting from the wire side, into the holes until the end of the contact is flush with the opposite mating surface of the connector.
Attach a male Molex connector to the end of each of the two wires going to the keyless control box. Press these contacts into the car half of the connector starting from the wire side until the spring tangs on the contact just pop out on the other side.
Now, apply a small dab of epoxy on the wire side of each new contact to the wire securely in the housing.
Reassemble the rubber dust boot to the door side of the connector, reinstall the body side connector into its cutout, and reattach both halves. Press in the green pin after the halves are mated.
One additional connection not mentioned in the Garage write-up has to do with the parking light flash feature. If you want your parking lights to flash twice when activating the Keyless unit with the remotes, then make the following connection.
Remove the two Phillips screws holding the panel below the steering column and remove the panel. Attached to the column, is a large black connector. Locate the light green wire coming out of this connector and connect the yellow lead from the keyless control unit to it. That’s it. Your parking lights and your instrument lights will now flash twice whenever the control unit receives a signal from the remote.