
 ’99 Miata Trunk Light Modification
Back in 1999 I wrote up some instructions to help other Miata enthusiasts make a minor change to their cars, for less than $8 and about two hours of time, which I thought made a worthwhile improvement to the car design. I’ve included a copy of my instructions below if anyone is interested in how I made this modification.
One thing the Miata designers had overlooked was a trunk light. However, the ’99 rear-end redesign moved the license plate lights from the back trim panel to the bottom of the trunk lid. When the trunk is opened and the Miata’s lights are on, these license plate lights do a wonderful job of illuminating the trunk. I decided to make a modification that would allow them to come on when the trunk was opened, but without having to turn on the parking lights.
Tools and Materials Needed
- #2 Phillips Screwdriver
- 10mm Wrench
- Hammer
- 5/32″ Drill Bit and Drill
- Wire Cutters
- Soldering Iron and Solder
- Black Electrical Tape or Heat Shrink Tubing
- An Inline Fuse Holder, Radio Shack PN 270-1238 $1.59
- 3 Amp Fuse, Radio Shack PN 270-1065 $1.99
- A High Current Diode (rectifier), Radio Shack PN 276-1141 2pcs for $0.99
- Molex Connector, 2 Position, Radio Shack PN 274-222 $0.99
- A Miniature Switch, McMaster-Carr PN 7779k51 $1.86 ea. http://www.mcmaster.com or (732)329-3200
- 2ea 6-32×3/4″ Pan Head Machine Screws w/Nuts and Lock-Washers (or NyLock Nuts)
- 14′ of 18 Gage Hook-Up Wire
- 1/4″ Ring Connector for 16-20Ga Wire
- Small Wire Ties
Trunk Latch Modification
I added a small switch to the trunk latch to signal when the latch is unlocked. This can also be accomplished with a pin type door switch, but I opted for a completely hidden solution. When the switch and wiring modifications presented are completed, no one will be able to tell anything is different from the way Mazda made it, until they notice that they can see into their trunk.
Latch Removal
In install the switch we have to remove the latch. To get to the latch, remove the Phillips screw at the bottom of the plastic storage bucket in the trunk. Next remove the carpet and battery cover. Now remove the back and right side trim from the trunk. The trim is held in place with plastic pushpins. Using your fingernails, pull the center of the pin out until it stops (about 1/8″) then grab the outside of the pin and pop it out.
Once the trim is out of the way, we can get to the latch. First make a “match mark” on each side of the latch so that it can be reinstalled back in the same place. This will save a lot of adjustment trouble later on. Remove the two 10mm headed bolts; one on each side of the latch.
At this point the latch is still held on by the remote trunk release cable and the lock rod. To release the lock rod, rotate the orange plastic clip counterclockwise until it unsnaps from the rod. The rod can now be pulled straight out of the latch. Unsnap the white plastic cable end of the remote release from the latch housing. Note which groove the housing is snapped in, we will want to replace the cable the same way. Now, rotate the end of the cable clockwise to disengage it from the release lever. This should free the latch mechanism from the car.
At the bottom of the latch housing is a small upside down “T” shaped tab. This tab currently has a small jog in it that we need to pound flat with our hammer. Once the tab is flattened, we are ready to mount the switch.
Attach the Switch
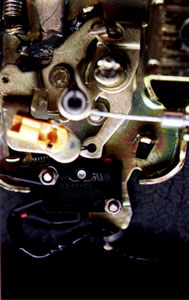
Hold the switch in position and operate the latch a few times to make sure the button on the switch is being pushed down enough to make contact, but not so much as to cause the lever to contact the switch body. To close the latch, rotate the catch at the top clockwise until it clicks. To unlatch it, move either the rod attachment point or the cable attachment to the right (looking at the back of the latch). When you are confident the switch is positioned correctly, mark the location of the two screw holes on the trunk latch and drill the latch for the screws.
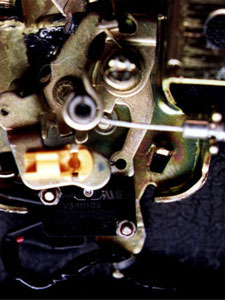
Before mounting the switch for the final time, we need to pre-wire it. Cut two pieces of wire approximately 6″ long. Solder one wire to the lower tab on the end of the switch and solder the other one to the bottom tab. Sorry about having to solder the wires, but there really is not enough room when the switch is mounted to use crimp connectors. Put heat shrink tubing over the connections and also cover the other tab on the end. All of the contacts on the switch need to be well insulated. If you don’t have shrink tubing, careful application of electrical tape should work as well. Now, bend the two tabs on the end away from the center to make sure they clear the raised lip on the trunk latch frame.
Attach the female Molex housing using the male pins to the other ends of the wires. The pins can be crimped or crimped and soldered. Soldering makes for a much more reliable connection. Push the contacts into the back of the connector until they click.
Now mount the switch to the latch. Double-check the operation of the lever and switch. The little “T” tab at the bottom makes a great place to use a wire tie to strain relief the wires coming from the switch.
Re-Install the Latch
First thing to do is reconnect the remote trunk release, if you really want to. Think about it first. Having the release in the center console leaves you with no secure place to put your valuables. The lock on the console can be defeated with a sharp tug. If you do not reconnect the cable, the only way into your trunk is with the key.
If you do decide to reconnect the cable, slip the ball into the lever and rotate the cable counter-clockwise until you can snap the white cable end onto the housing in the same groove it was in when you took it out. Now reinsert the lock wire into the orange bushing. Rotate the busing clockwise to latch the wire in place. Now reinstall the two bolts (a little Locktite couldn’t hurt) lining up the match marks you made before. That’s it for the mechanical stuff.
Wiring the Switch
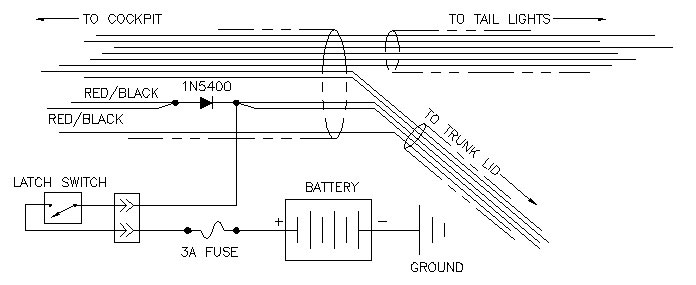
Start by disconnecting the negative terminal from the battery. You’ll need a 10mm wrench for this. Now take a 5′ and a 8′ piece of hookup wire and attach a female Molex contact to each of the wires. Insert the longer of the two wires into the contact so that it will mate with the wire going to the side of the switch. Insert the shorter wire so it matches with the wire coming from the bottom of the switch.
Connect the two halves of the connector and route the short wire to the positive terminal of the battery. Run the long wire along the wire bundle that goes around the right side of the trunk near the top. The wire needs to end up where the bundle splits off and one section travels up the right trunk hinge.
Let’s finish up the battery connection. Attach the fuse holder containing a 3A fuse to our wire near the battery and put the ¼” ring terminal on the other end of the fuse holder. Attach the terminal underneath the nut on the positive battery connector. You can reconnect the positive terminal at this time, but leave the negative battery terminal disconnected.
Now to work on the business end of the wiring. On the right trunk hinge, near the trunk lid, the wire harness is held on with a harness tiedown. Press the little “arrowhead” on the back of the hinge together and pop it back through the hinge. There is another one of these tiedowns on the harness in the trunk right before it “Y’s” off to the trunk lid. Pop this one loose too. Remove the black tape for 3 to 4 inches on all three legs of the “Y” at the trunk hinge. You will also need to remove the orange tape and the tiedown from the harness. On the branch that goes into the trunk lid, locate the two small RED wires with a BLACK STRIPE. Trace these wires back into the branch that goes towards the cockpit. Cut both of these wires about 2″ back towards the cockpit from the “Y”.
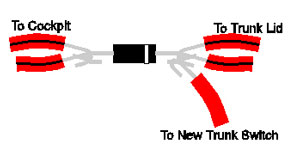 Attach both of the ends of the wires leading into the cockpit to the un-banded end of the diode. Don’t let the fact that we are tying these wires together bother you. They are actually combined farther back in the wiring harness. It was just easier to make the attachment here than way back under the package shelf. Be sure to solder this connection securely. Now we are going to attach the other ends of the cut wires (the ones leading into the trunk lid) along with the wire from our latch switch to the banded end of the diode. Solder this connection securely too. Here is what the diode and the wires should look like:
Now wrap this diode and the wires well with electrical tape and then rewrap the wire harness with the tape. Reattach the harness tiedown with electrical tape, too. Make sure the diode is securely wrapped to the harness so that it will not be strained if the wires are pulled on, and pop both harness tiedowns back in place.
Testing
Now we can check and see if all of this was worth it. Reconnect the negative battery terminal. The trunk lights should now be lit. If they aren’t, you probably left the latch in the locked position. Use your key to unlock the latch. Now the lights are lit, aren’t they?
So, shut the trunk. The lights should go off. If the trunk does not latch, you didn’t get the latch back in the exact same place it was before we started. Double check your match marks and re-align the latch. When the latch finally catches on the trunk lid, the lights will go out.
Now that everything is working correctly, put the trunk trim back in. Push the outside of the plastic fasteners all of the way in before you push the center down. Put the battery cover back in and lay the carpet in place. Finally put the plastic bucket back in and tighten its screw.
You should now have trunk lights whenever you need them regardless of whether your lights are on. Happy motoring!