Spindle and Wheel Nut

This entry is part 3 of 8 in the series Cut Knurling Tool

Details 03 & 05, the Spindle and Wheel Nut

spindle1
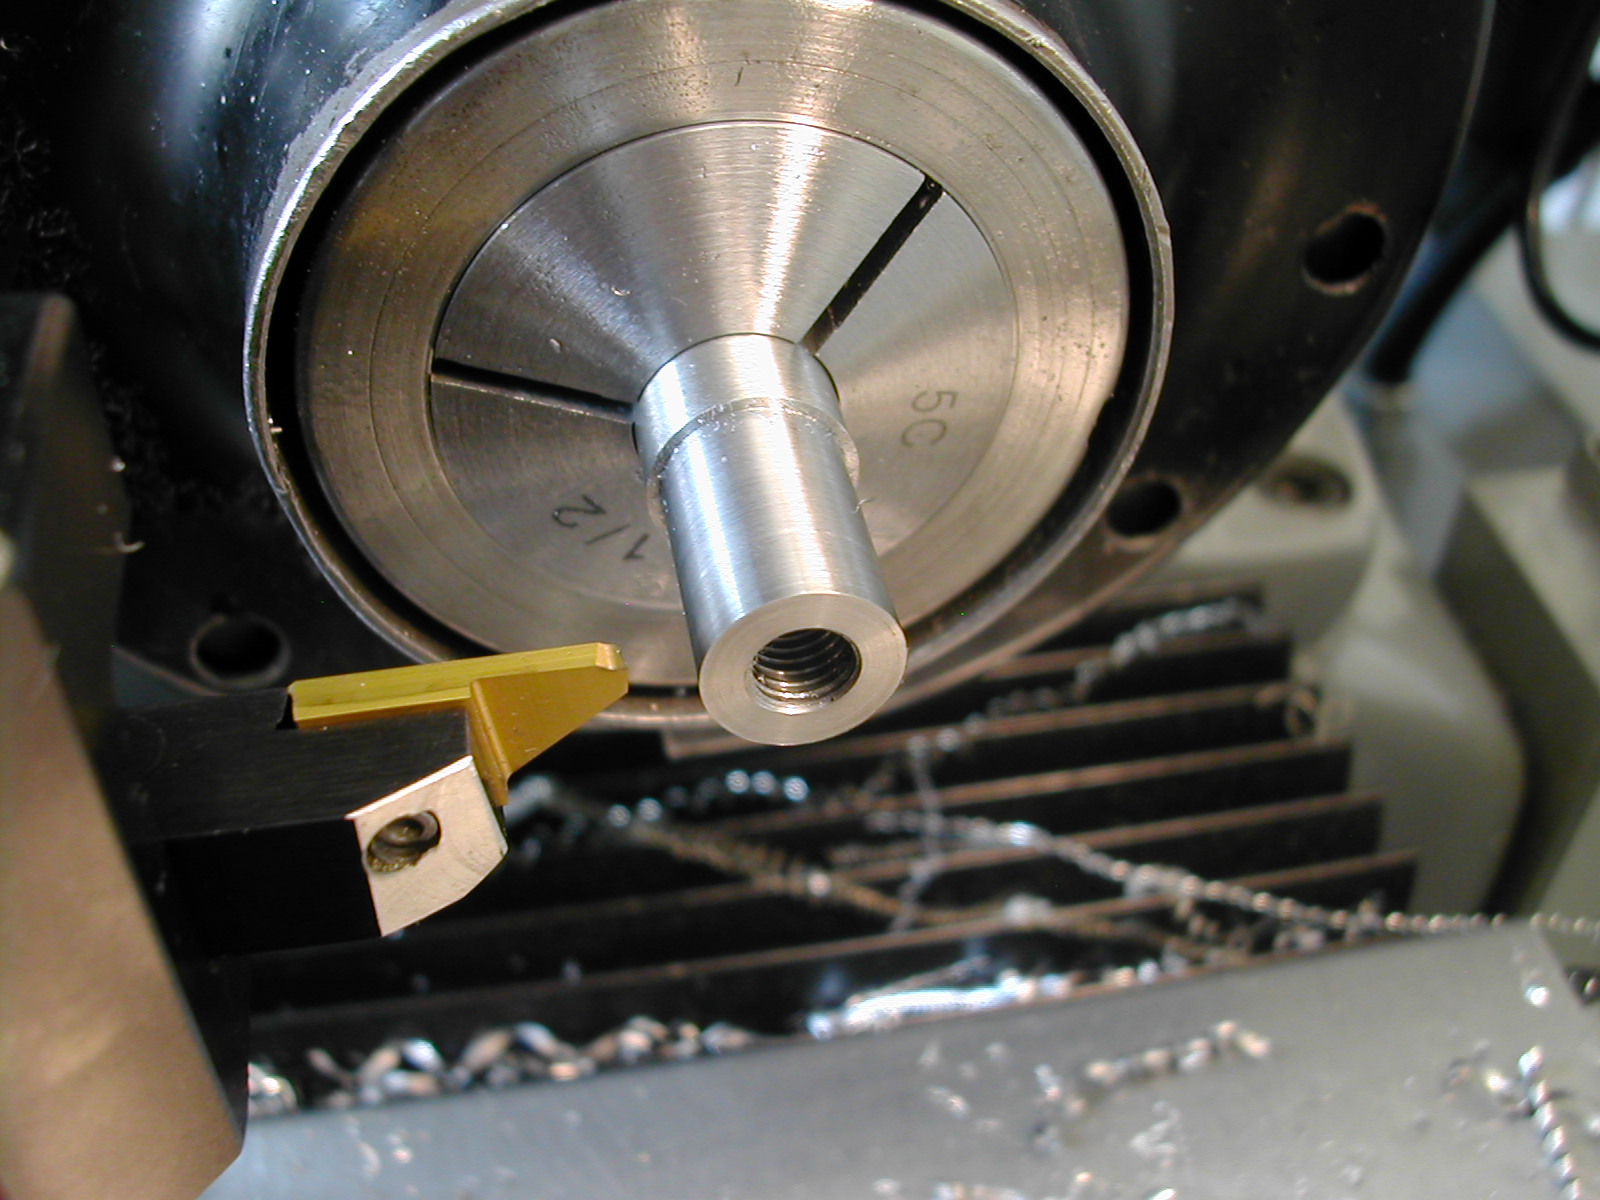
After finishing the Tool Holder Head and Arm, I tackled the Spindles next. I need to fit the Spindle Housings to the Tool Holder Head, and in order to make the spindle housings, I need to finish the Spindles first. And, I’ll need the nuts to check the spindle threads. So nuts first and this time I don’t have to start with squaring up round stock. I’ve turned about an inch of 1/2″ 17-4 H1150 down to 0.440″. This is just larger than across the diagonal of the 3/8″ nut. This was followed by drilling and tapping 1/4-28.

Continue reading

Tool Holder Arm and Head

This entry is part 2 of 8 in the series Cut Knurling Tool

Details 06 & 07, the Tool Holder Arm and Head

head1I started with Detail 07, the Tool Holder Head. The spindle housings should fit in the head without slop but still be easy to turn. To accomplish this they need to be a very close fit with good surface finished. It will be much easier to sand/lap the spindle housings to fit whatever size the bores turn out in this part than it would be to hone the bores without them becoming bell mouthed. So this piece of Ø1.5″ material needs to get squared up so we can get started.

Continue reading

Bike Light Electronics Package

This entry is part 3 of 3 in the series Bike Light

To finish up I needed hardware and firmware.

The Electronics Package

schematicCompared to the machining, the electronics are a piece of cake. I’m using an Atmel AVR ATTiny13 to control the brightness. +5V Power for the µController is provided by the BuckPuck, the BuckPuck brightness control pin is driven by a PWM signal generated by the µController, and the human interface is a single pushbutton.

Continue reading

Bike Light Housing

This entry is part 2 of 3 in the series Bike Light

With the battery assembly done, I turned to …

The Light Housing

cad_lightThe Endor Rebel LED generates some heat as we pump 0.7A through it at 9V. Therefore, it needs a heatsink, so that pretty much means the housing we design needs to be made out of Aluminum and needs good physical contact with the LED’s aluminum base. So, again we start with a 3D CAD model. The first thing we need to do is model the actual Rebel LED since everything else grows from there.

Continue reading

Bike Light Battery Pack Adapter

This entry is part 1 of 3 in the series Bike Light

Design and build of a 540 lumen Luxeon Star Endor Rebel bike light powered by a Makita 18V Li-ion battery (note: I made this while an expat living in China and so was very limited in the materials, parts, and tools available.)

bike_sideThis project is a combination electronic/mechanical design. In fact, there’s a lot more time spent on the mechanical design and machining than in the simple Atmel AVR µController. I’ll be presenting this project in three major parts: The battery pack adapter; the light housing; and the AVR control circuit. In the project sources, I provide the full Continue reading

MultiTherm Logging and Demo Board

This entry is part 3 of 3 in the series MultiTherm

Logging

loggingThe logging mode is entered by pressing any button other than MODE while on the startup screen. Along the left-hand side of the screen are either one or two device numbers and temperature readings in °C. These readings are the result of the previous temperature scan. The time of the last scan is displayed in the upper right, and the time until the next reading is displayed in the lower right. While in logging mode, the UP Continue reading

MultiTherm Operation

This entry is part 2 of 3 in the series MultiTherm

The software for the MultiTherm logger is based on a state machine. There are multiple operating modes or “states” of which the logger will in one at any given time.

initUpon startup, the current version of the firmware will be displayed followed by the number of DS18x20 (either DS1820 [discontinued], DS18B20, or DS18S20) temperature sensors discovered on the 1-Wire bus. A few seconds later a message Continue reading

MultiTherm Development

This entry is part 1 of 3 in the series MultiTherm

Multi ple  Therm ometer – A small AVR µController based datalogger to display and record the output from multiple DS18x20 thermometers.

This began as a simple monitor for a friend to keep track of the temperature of his bicycle dynamometer. It was envisioned as a device to grab the temperature information from a couple of Dallas Semiconductor DS18x20 1-Wire® Thermometers and send the information to a serial port of a laptop computer for logging and subsequent graphing and analysis. It evolved into what is presented here.

Continue reading

Design a Custom AC Timer

This entry is part 1 of 2 in the series IR AC Timer

A fun little project to turn the AC unit on in my office before I get to work in the morning.

Overview

installedHere in China there is no central air, so my office is heated/cooled by a room air conditioner. Because of this, it’s cold when I arrive at work in the winter, and hot in the summer, and it takes until about noon for the little room a/c unit to get the room to a remotely comfortable temperature. So an idea was born to create a small, battery powered, IR emitter Continue reading